
PINHOLE POSITIVES & NEGATIVES
HOW YOUR EYES SEE:

HOW CAMERA OBSCURA/PINHOLE SEES:
The "can-era" you will be using is a small camera obscura.


DIRECTIONS: IN THE DARKROOM...
1. Put paper in the can. Shiny side of paper facing the pinhole.
2. Lid the can, tape the possible light leaks with black electrical tape.
3. Return to classroom.
4. Place camera on surface w/pinhole facing you.
5. Sit/stand in front of pinhole.
6. Remove tape and make an exposure for 2m36sec.
7. After exposure time, cover pinhole w/tape.
8. Return to darkroom and take the paper through the chemical+water bath process.
9. Hang image to dry for minimum TWO hours.
10. Come back and collect your image.
EXAMPLES & RESOURCES:


GALLERIES.
Pinhole.org (HERE)
Pinhole @ Photo.net (HERE)
Worldwide Pinhole Day (HERE)
An in depth site about pinhole photography past and present (HIGHLY recommended)
CLICK HERE.
HISTORY OF CAMERA OBSCURA
The pinhole camera is based on the principals of a “camera obscura.” (Camera = Latin for “room” - - Obscura = Latin for “dark”)
The earliest mention of this type of device was by the Chinese philosopher Mo-Ti (approx. 500 BC). He formally recorded the creation of an inverted image formed by light rays passing through a pinhole into a darkened room. He called this darkened room a "collecting place" or the "locked treasure room." Aristotle (384-322 BC) also understood the optical principle of the camera obscura. He viewed the crescent shape of a partially eclipsed sun projected on the ground through the holes in a sieve, and the gaps between leaves of a plane tree. In the 16th century, Leonardo da Vinci is credited with giving a description of the pinhole camera more or less as we think of it today.
CAMERA OBSCURA:

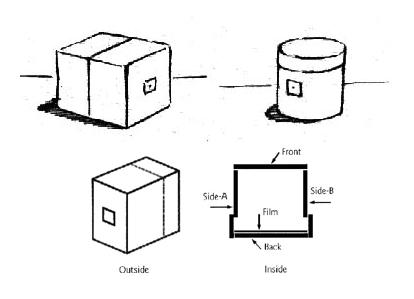
A BASIC CAMERA:
A pinhole camera is easy to build. The camera can be made from almost anything-from tin cans, shoe boxes, and as Ralph Howell showed you in the video, fruits and vegetables.
When you make your first camera from scratch if you make it like a well made shoe box you can't go too far wrong. The picture above is a VERY simplified diagram of how the parts go together. The actual size of the camera is up to you. As long as you make the 'back' fit snugly onto the 'front' the camera will work.
How does a pinhole work? We see things because light rays reflect off of them and these reflected rays form an image on the retina. A camera is a mechanical eye, so it might be useful to think of it in these terms; we use the term 'ray' of light when we talk about using lenses to form an image. We use the term 'beam' of light when we talk about making images with a pinhole. The difference is one of dimension. A ray of light is defined as a line of light, while a beam of light is defined as a bundle of parallel rays.
Light falling on an object reflects off in all directions. When a lens is used to make an image rays from the same point on the object are reflected to its surface, this forms a cone of light. As the rays pass through the lens they are bent or refracted and as they are made to to disperse, they are again formed into a cone, the diminishing end of which is the point of focus...got that?
Consider this...a photograph is really composed of points of light that vary in size. If the points are too large the image will not be sharp. What this means is that pinhole images aren't as sharp as images made with a lens, and that the size of the pinhole will determine how soft or sharp your images are...as well as determining the time you'll need to expose the film or paper for…
"World’s Largest Camera Big Enough to Hold an Airplane"


The story and more pictures HERE.

A homemade "pinorama" camera HERE.
A great site for pinhole photogs HERE.
And a site for pinhole resources HERE.

The shutter of Michael Chrisman’s pinhole camera was open for 31,536,000 seconds.
HERE.