 WHAT IS PHOTO 1? 📷 An image making class where you will learn to gain control of exposure and understand fundamentals of
two-dimensional image making. You will explore creative concepts to make
photographs that represent your unique creative
eye. The class covers a
broad range of fundamental principles in photography, from camera control to elements
& principles of art and creativity, providing you with a foundation for
growth in making photographs.
WHAT IS PHOTO 1? 📷 An image making class where you will learn to gain control of exposure and understand fundamentals of
two-dimensional image making. You will explore creative concepts to make
photographs that represent your unique creative
eye. The class covers a
broad range of fundamental principles in photography, from camera control to elements
& principles of art and creativity, providing you with a foundation for
growth in making photographs.
- Operation of the camera (SLR) (Standards #1)
- Wet Lab Darkroom processes and skill (#1)
- Digital Darkroom processes and skills (#1)
- History of photography (#3)
- Elements of two-dimensional design (#1, #2)
- Aesthetic and theory in photography & art (#2)
THE PLAN (Objectives). We will…
· Learn about photographic
elements of
art and principles of design, composition, and lighting.
· Explore the history of
photography - scientific and technological developments, important innovators, and
relevance within cultural contexts.
· Blog and speak about aesthetic, technical and expressive qualities in an image.
· Learn image techniques
and digital manipulation using the digital darkroom.
· Learn how to manage and
creatively alter digital images as well as critically analyze the use of
visual media as a means of communication..
· Explore the significance of photography within the larger context of the art word, &
its application to the modern world.
· Possibly begin formulating your own personal visual vernacular (visual language).
PROJECTS (The Creative Process).
· Photography is the observance and
recording of light: the
foundation for all we will do.
· Projects will be a range of one-class,
overnight, multi-day, and sometimes week(s)-long activities.
· Critiques (partner, small group, full
class) will happen a few times. They’re painless, and will probably make you
feel good about your work
Some of what we will do:
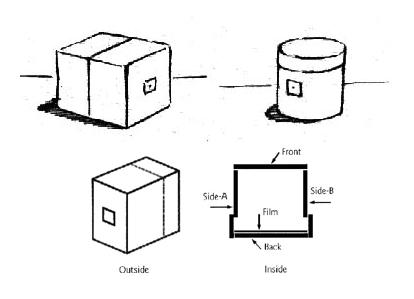
- Pinhole cameras & Photograms (a darkroom
process)
- Photographic scavenger hunt(s)
- Fundamentals (rule of thirds, balance, leading
lines, elements of design, etc.)
- Light: available, direct/hard, side,
back/silhouette, soft/diffused, ambient, spot, reflected, shadow, golden
hour
- Monochrome (Black & white) & tinted images
- Macro (close-up)
- Motion blur, light writing, action photography
- Portraiture
- Candid photography
- Landscape
- Self-portraiture (the final)
- Photo blog of your work
- Digital photo basics (resolution, sensors, etc.)
- Photo editing (Photoshop)
- Photo experimentation (cloning, infrared,
stereographic planet, collage, multiple exposure, developing techniques
for a variety of visual effects, etc.)
TAG. To ensure that students designated as “Talented as
Gifted” (TAG) receive academic instruction that is appropriate for their rate
and level of learning, the curriculum and instruction of this course may be
differentiated to include specialized groupings, compacting of curriculum,
accelerated pacing, and providing of extension / challenge activities (this
would be different work of a complementary nature and not extra work on top of
existing assignments).
YOUR EQUIPMENT (Cameras+) You
will need to have access to the following
· DIGITAL
CAMERA. (Ideally)
A digital SLR (the kind with a removable lens) – or – digital point-and-shoot – or – the
camera on your smartphone. Bring your camera daily unless otherwise
noted.
· CABLE to connect the camera to a computer – or – a card reader
for your memory card – or – your
photos sent to yourself through email – or – saved/accessed
via your Google Drive. This will be a daily need.
· 35mm FILM
CAMERA. Start
looking/asking now. Grandparents, neighbors, coworkers, garage sales,
Craigslist, stuff-for-free sites. Begin asking! You might be able to find one
for free.
CLASS EQUIPMENT
Computers & Darkroom - Each photographer is assigned a computer station for the duration of the semester. The computer can be used for school work only, and is the responsibility of that photographer for the duration of each class period.
Food and drink are not allowed in the room.
Bottled water is to be kept at floor level.
The student/family is responsible for repair/replacing class equipment if the damage is caused by negligence or non-adherence to standards of conduct.
THE GRADE (Yes, you can!).
· Up to four (4) points earned for
assignments/projects.
· A few projects will be worth more than 4
points, as they will involve multiple components.
· The semester grade is a cumulative total
of points earned.
PRESENT/CURIOSITY SCORE. For each day we meet that you are intellectually &
mentally present and engaged for the duration of class you will earn one point.
The point is forfeited if you are observed texting, doing other homework,
sleeping, staring into space, etc. The whole
point of this is to practice being curious and present. The goal is that
you are curious about your own experience, and are actively engaged.
EXTRA CREDIT.
· Extra credit points are only added to
your cumulative semester grade at the end of the semester.
· Extra credit points can be earned by
doing more than the minimum (TBD per project) for an assignment.
· Missing assignments nullify any extra
credit earned (Meaning: extra credit does not take the place of a missing
assignment).
MISSED/LATE WORK. If you are absent, do the following, in this order:
1. Check the blog for the current/new assignment. Do this during your absence. Complete that assignment to the best
of your ability - even if you were not here for the explanation. Read the class
blog and follow the directions.
2. If you are unable to complete the project
as it is posted on the blog - do
something(!) - so your return can be productive.
3. When you return from an absence, come
to me with questions you have about the assignment on the blog.
4. Ask me to review your blog/work when
you have completed and posted the missing work.
*As per school
policy, the number of excused absences are the number of class
periods you will have to complete missed work.
ATTENDANCE & TARDIES. Be
in class, unless you are sick, have a fever, and/or are contagious.
· After an excused absence (with a note) –
AND after you have reviewed the website - you will be briefed on what was
presented when you were absent.
TARDIES. Being
late is disruptive and inconsiderate. If
you enter the classroom tardy, please do so quietly.
Every two
tardies (without a note) for the semester will result in your final cumulative
grade being lowered by 2%.
OUR SHARED SPACE (The Studio Classroom).
SAFETY & CLASS BEHAVIOR.
· My top priorities are your physical and
intellectual safety, and your artistic/educational growth.
· Autonomy is inherent to the class. You are trusted to
make all you do appropriate.
· Computers, darkroom, chemicals, and all class
equipment are addressed on the attached equipment contract. (Sign & Return)
· If learning/safety is compromised, a
verbal request will be given. If the compromise persists, the student will be
removed/ from the class and/or dropped from the course.
THE
END (…or
Beginning). If
you choose to participate, the outcomes should be:
· Understand technical and aesthetic differences between traditional and digital photography.
· Make informed choices about composition when photographing and editing digital
images.
· Make informed choices about appropriate technologies for use in a variety of photographic assignments
· Analyze and discuss complex ideas in works of art and photography.
· Create original works of art of increasing complexity and skill that reflect
their feelings and point of view.
· Describe the relationship involving the art maker, the process, the
product and the viewer.
· Demonstrate proper camera and digital processing techniques in production of a work of art.
· Understand and utilize the steps in the creative process.
· Be aware of the
vast amount of career choices in the visual arts.
· Possibly begin producing
a portfolio of work that could be the basis when moving on to Photo 2.

 met·a·phor